

Data generated by IoT devices is growing at an unprecedented rate, making it increasingly challenging to manage and analyze. While AWS IoT provides robust capabilities for device management and data ingestion into other services such as databases like DynamoDB, some organizations prefer to store their IoT data in existing databases that already contain their existing data and business workflow.
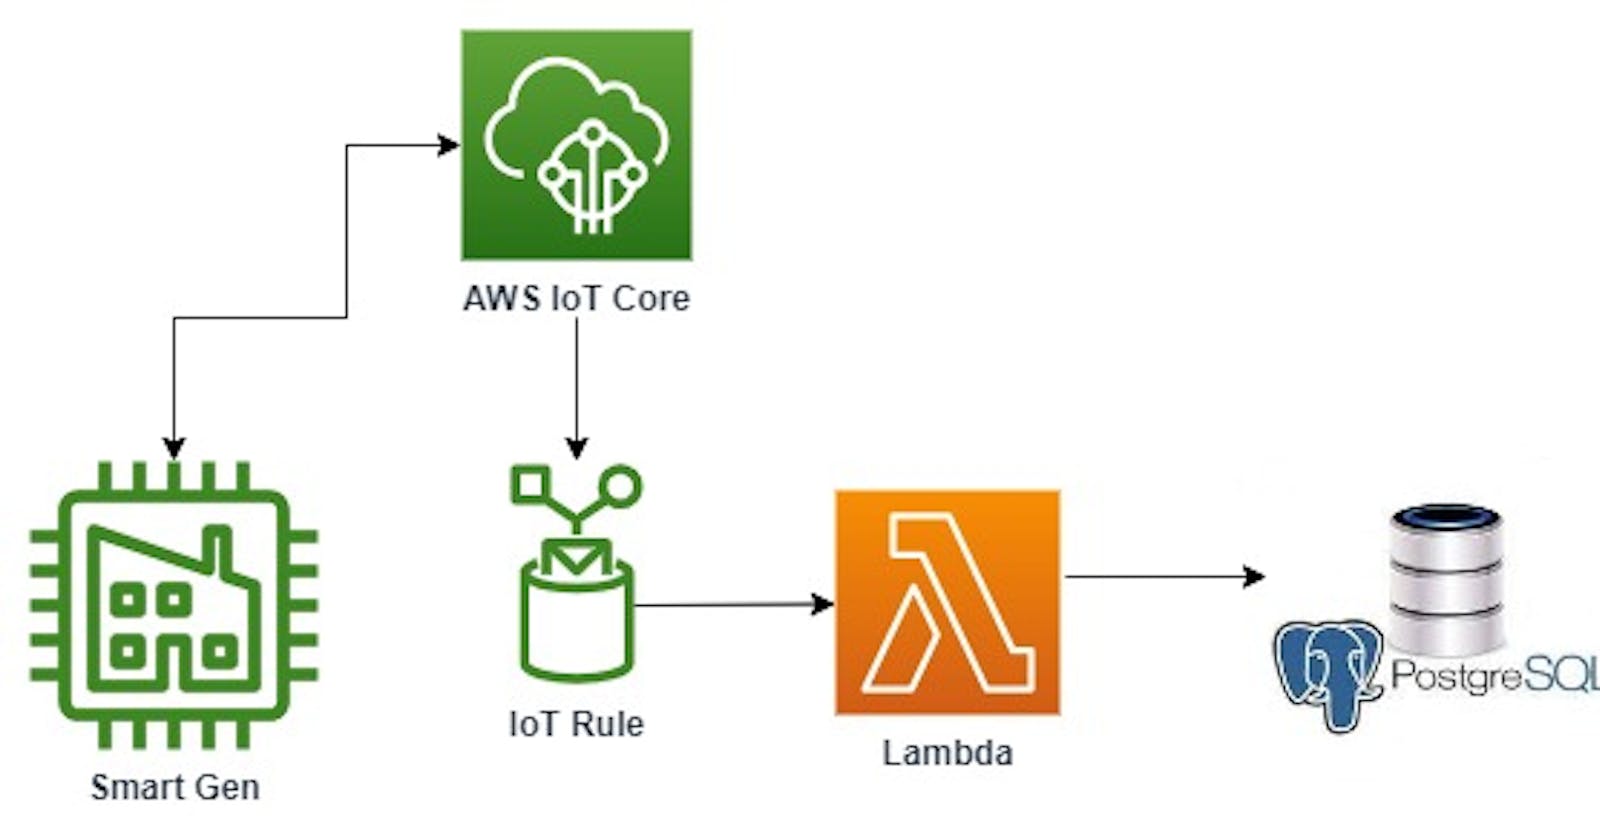
In this article, you will learn about a serverless solution that uses AWS Lambda to persist data from AWS IoT to a PostgreSQL database hosted outside of AWS. By combining IoT data with operational data, organizations can gain valuable business intelligence insights that can drive better decision-making. Irrespective of the location of the database(whether in or out of AWS), this solution works seamlessly.
Pre-requisites
An AWS account with appropriate permissions to create and manage AWS services
Node.js installed on your local machine
Familiarity with AWS IoT and AWS Lambda
A Render account with access to a PostgreSQL database instance
AWS IoT Thing and an IoT rule connecting the AWS MQTT broker to AWS Lambda. Follow this link to learn how to create this.
Serverless framework credentials
Project Setup
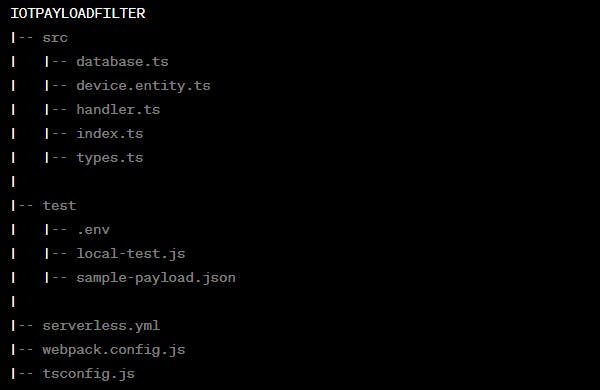
The entire codebase for this project is written in TypeScript. To set up your TypeScript project, you can refer to this helpful article which provides step-by-step instructions. The necessary files to be created should look like the directory in the image below.
Since the TypeScript code will be compiled into JavaScript, there is a need to configure compilation settings and enable the use of metadata and decorators.
{
    "compilerOptions": {
      "module": "commonjs",
      "removeComments": true,
      "emitDecoratorMetadata": true,
      "experimentalDecorators": true,
      "allowSyntheticDefaultImports": true,
      "noImplicitOverride": true,
      "target": "es2019",
      "sourceMap": true,
      "outDir": "./dist",
      "baseUrl": "./",
      "esModuleInterop": true,
      "strict": true,
      "forceConsistentCasingInFileNames": true,
      "moduleResolution": "node",
      "noImplicitAny": true,
      "skipLibCheck": true,
      "strictPropertyInitialization": false,
      "typeRoots": [ "./node_modules/@types"],
      "resolveJsonModule": true
    },
    "exclude": ["node_modules"],
    "include": ["src/**/*.ts"]
  }
The following dependencies need to be installed:
TypeORM is used to handle all database-related operations in this project. It is an object-relational mapping (ORM) library that will allow seamless interaction with the database using TypeScript objects instead of SQL statements. It provides a clean, declarative syntax for defining database schema and data access methods, and supports multiple database platforms.
npm install typeormReflect-metadata: It enables the collection and management of metadata that relates to decorators. This is especially useful when dealing with frameworks like TypeORM.
npm install reflect-metadatapg: PostgreSQL driver for managing queries and connections.
npm install pgClass-Validator: For defining and enforcing validation rules
npm install class-validator
Data Schema and Modelling
The use case for this application is a smart generator and the expected data is represented with the model below:
export class SmartGen {
  deviceID:string;
  clientId:string;
  status:number;
  vPhase1:number;
  vPhase2:number;
  vPhase3:number;
  I1:number;
  I2:number;
  I3: number;
  realPower1:number;
  realPower2: number;
  realPower3: number;
  apparentPower1: number;
  apparentPower2: number;
  apparentPower3: number;
  powerFactor: number;
  frequency: number;
  kwh: number;
  signalStrength: number;
}
This model will form the foundation for how our entities and table will be structured. If your incoming data is different, adjust the model to fit it. We will use A PostgreSQL instance hosted on render. You can use any self-hosted PostgresSQL instance available to you. Once the model is created, the entity which is basically the model decorated with @Entity can be created. The device.entity.ts file will create the table, add columns, and also provide rules for data validation which helps to enforce a specific format for the incoming payload.
//device.entity.ts
import { Entity, PrimaryGeneratedColumn, Column, CreateDateColumn, UpdateDateColumn } from "typeorm";
import { IsUUID, IsNotEmpty, IsInt, IsNumber,IsIn,IsDecimal, IsDateString, Matches } from "class-validator";

@Entity({ name: 'smartGenTable'})
export class SmartGen {
  @PrimaryGeneratedColumn('uuid')
  @IsUUID()
  id: string;

  @Column()
  @IsNotEmpty()
  @Matches(/^(GEN-\d{4}-\d{4})$/, { message: 'deviceID must contain the string GEN and 8 numbers' })
  deviceID: string;

  @Column()
  @IsNotEmpty()
  @Matches(/^(SN-\d{3}-\d{3})$/, { message: 'clientId must contain SN and 6 numbers' })
  clientId: string;

  @Column()
  @IsInt()
  @IsIn([0,1])
  status: number;

  @Column('decimal', { precision: 10, scale: 2 })
  @IsDecimal()
  vPhase1: number;

  @Column('decimal', { precision: 10, scale: 2 })
  @IsDecimal()
  vPhase2: number;

  @Column('decimal', { precision: 10, scale: 2 })
  @IsDecimal()
  vPhase3: number;

  @Column('decimal', { precision: 10, scale: 2 })
  @IsDecimal()
  I1: number;

  @Column('decimal', { precision: 10, scale: 2 })
  @IsDecimal()
  I2: number;

  @Column('decimal', { precision: 10, scale: 2 })
  @IsDecimal()
  I3: number;

  @Column('decimal', { precision: 10, scale: 2 })
  @IsDecimal()
  realPower1: number;

  @Column('decimal', { precision: 10, scale: 2 })
  @IsDecimal()
  realPower2: number;

  @Column('decimal', { precision: 10, scale: 2 })
  @IsDecimal()
  realPower3: number;

  @Column('decimal', { precision: 10, scale: 2 })
  @IsDecimal()
  apparentPower1: number;

  @Column('decimal', { precision: 10, scale: 2 })
  @IsDecimal()
  apparentPower2: number;

  @Column('decimal', { precision: 10, scale: 2 })
  @IsDecimal()
  apparentPower3: number;

  @Column('decimal', { precision: 10, scale: 2 })
  @IsDecimal()
  powerFactor: number;

  @Column('decimal', { precision: 10, scale: 2 })
  @IsDecimal()
  frequency: number;

  @Column('decimal', { precision: 10, scale: 2 })
  @IsDecimal()
  kwh: number;

  @Column()
  @IsNumber()
  signalStrength: number;

  @CreateDateColumn({ name: 'created_at' })
  @IsDateString()
  createdAt: Date;

  @UpdateDateColumn({ name: 'updated_at' })
  @IsDateString()
  updatedAt: Date;
}
The entity here also includes auto-generated columns such as id and date-based columns.
Once the entity has been set up, it can be used to set up the data source. The code snippet below represents the database.ts file and it configures a PostgreSQL database connection using TypeORM. It retrieves environment variables for database credentials and connection details. The configuration dynamically sets SSL options based on the environment, enabling SSL in a production environment.
//database.ts
import { DataSource, DataSourceOptions } from 'typeorm';
import { SmartGen } from './device.entity';
import * as dotenv from 'dotenv';
dotenv.config();

export const DbConfig: DataSourceOptions = {
    type: 'postgres',
    username: process.env.DBUSERNAME,
    host: process.env.HOST,
    database: process.env.DATABASE,
    password: process.env.PASSWORD,
    port: process.env.PORT ? parseInt(process.env.PORT, 10) : 5432,
    synchronize: true,
    logging: false,
    entities: [SmartGen],
    ssl: process.env.NODE_ENV === 'production' ? { rejectUnauthorized: false } : undefined
  };

export const AppDataSource = new DataSource({ ...DbConfig });
Processing IoT Data
The handler.ts function is responsible for handling and processing the data generated by the IoT devices.
//handler.ts
import { validateOrReject, ValidationError } from 'class-validator';
import { AppDataSource } from "./database";
import { SmartGen } from "./device.entity";
import { Payload } from "./types";
import * as dotenv from 'dotenv';

dotenv.config();

export async function Handler(event: Payload) {
  try {
    await validateOrReject(event);
    await initializeDataSource();
    const savedData = await createAndSaveSmartGen(event);
    return { success: true, data: savedData };
  } catch (errors) {
    console.error('Validation failed. Errors: ', errors);

    if (errors instanceof Array && errors.length > 0 && errors[0] instanceof ValidationError) {
      console.error('First validation error: ', errors[0].toString());
    }

    return { success: false, error: 'Validation failed' };
  }
}

async function initializeDataSource() {
    try {
      if (!AppDataSource.isInitialized) {
        await AppDataSource.initialize();
        console.log('Data Source has been set up!');
      }
    } catch (err) {
      console.error('Error during Data Source initialization. Check config!', err);
      throw err;
    }
  }

  async function createAndSaveSmartGen(event: Payload) {
    const { frequency, ...rest } = event;
    const smartGenRepository = AppDataSource.getRepository(SmartGen);
    const newDataEntry = smartGenRepository.create(rest);
    newDataEntry.frequency = 10 * frequency;

    try {
      const savedData = await smartGenRepository.save(newDataEntry);
      console.log('Data saved to the database:', savedData);
      return savedData;
    } catch (err) {
      console.error('Error saving to the database:', err);
      throw err;
    }
  }
When an event is received from your IoT devices via the MQTT broker, the function springs into action. It uses the class-validator library for payload validation, ensuring data integrity. Once the validation has been done, the datasource connection is then initialized. With the connection in place, the event data is destructured and the necessary transformation is done before the data is saved into the database.
Deploying and Testing
The final step is to compile the code and deploy the lambda function to AWS. The wepback.config.js file is important to this aspect of things. It is responsible for configuring Webpack, defining bundling and build settings, and readying the Lambda function for deployment on AWS.
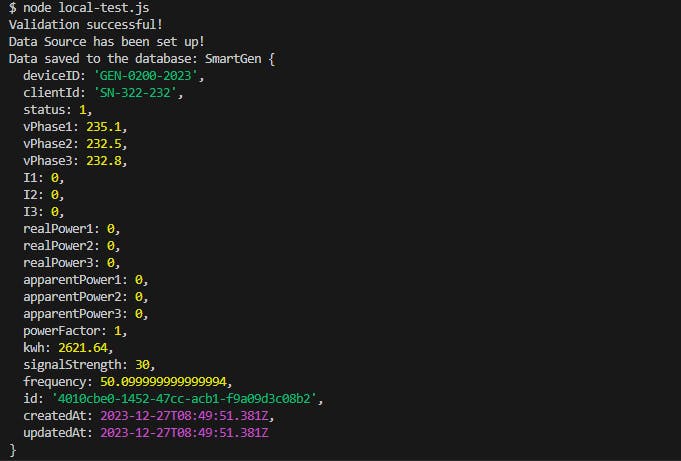
Before deployment to AWS, run the project locally by navigating to the test directory which contains local-test.js, .env for local environment variables, and a sample payload that can be used to test the project. To create a local instance of a PostgreSQL database, check out this article. The node local-test.js command runs the test script and should give an output similar to the image below.
Once the test runs locally, it can be deployed to AWS. The serverless framework that simplifies the deployment process will be used for deployment. The code snippet below shows the serverless.yml configuration file.
org: thathardwareguy
app: lambda-data-filter
service: lambda-data-filter

plugins:
  - serverless-webpack

provider:
  name: aws
  runtime: nodejs14.x
  stage: ${opt:stage, 'dev'}
  region: ${opt:region, 'us-east-2'}

functions:
  awsIotPostgresIntegration:
    handler: dist/index.handler
    events:
      - iot:
          sql: "SELECT * FROM 'metrics/gendata'"
          name: "IotPostgresRule"
          description: "Forwards AWS IoT data to Postgres database via AWS Lambda"
          sqlVersion: "2016-03-23"
The serverless.yml configuration file specifies the required plugins, such as serverless-webpack, and defines the AWS provider settings, including the runtime environment, stage, and region. It also outlines the Lambda function details, including the entry point (handler), and specifies the IoT event triggering with an SQL filter to select relevant events. To deploy the lambda function, the sls deploy command is invoked. You should get an output that looks like the image below if the deployment is successful:

Once the project is deployed, you can set your database secrets in your lambda environment to allow the function to access the Postgres database securely:

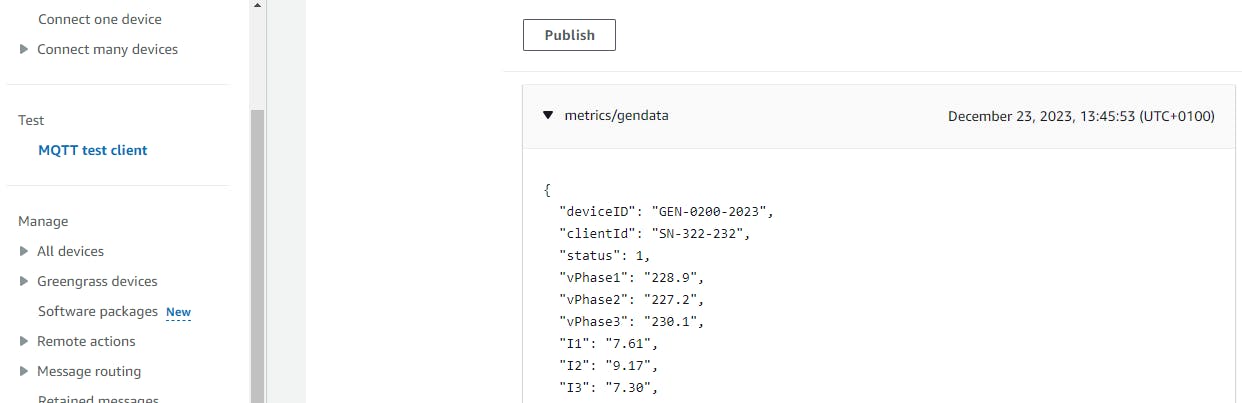
To verify if the entire system works well end-to-end, subscribe to the IoT topic configured in the serverless.yml file. You should get something similar to the image below:
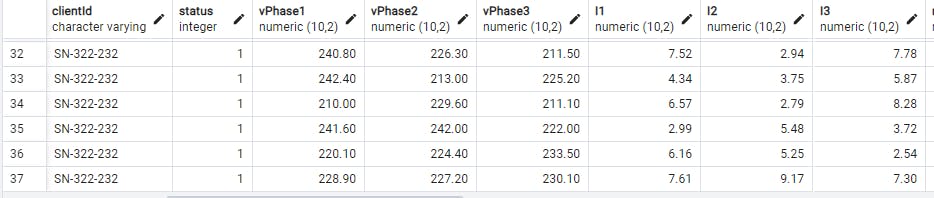
Once data is successfully ingested into AWS IoT, the IoT rule which was created via the serverless.yml file earlier should trigger the lambda function to save data successfully into the Postgres database in render:
This is a starting point for interfacing AWS IoT with services in and out of AWS. To make it more production-ready and cost-effective, a queuing system can be added to the infrastructure to make the system more reliable. My next article will cover integrating SQS into the infrastructure to enable queuing.
Codebase: https://github.com/thathardwareguy/iotPayloadFilter